Tuesday Tips & Techniques from Photo Pro Sascha Janson #8
On select Tuesdays, Cameras@Lembeh (the first and only Photo & Video Center in Lembeh Strait) will feature Tips and Techniques by Photo Pro Sascha Janson. Sascha will offer up a range of information, you never know what piece of wisdom he will impart.
Sascha says: If you want the best image quality, shoot in RAW!
Raw vs. JPEG? What is the difference? Why does my JPG image look better than my raw image? Do I have to shoot raw and JPEG? Many photographers are still undecided, but this article will give you the necessary information to help you make a decision.
Many digital cameras today, including both DSLRs and higher end compact cameras give us the option of saving our images as either raw files or JPEG files or both, raw & JPEG at the same time. Every time you press the shutter the camera takes a picture and saves it to the memory card. If the camera saves that picture as a JPEG file, a lot of data gets thrown away in order to get a reduced file size. All this detail is lost forever when shooting in JPEG. When shooting in raw format, all this detail is saved to the memory card and we have a lot more information to work with. As a result we can push the images a lot further than we could with JPEGs. Little mistakes we made in relation to exposure and white balance settings can be corrected without losing detail, giving us the flexibility to produce images of the finest quality. A raw file is like taking the original film negative into the darkroom and developing the photo yourself, with complete control over the final result. Raw files are often referred to as digital negatives and we have to use programs like Adobe Lightroom or Photoshop as a digital darkroom to process the raw files to JPEG, TIF or PSD before it can be published or printed. If you are not familiar with Lightroom / Photoshop (yet), but you might want to use it sometime later, you can always save your images in raw and JPEG and get a memory card with lots of memory space.
If you want to have the best possible image quality, shoot in raw.
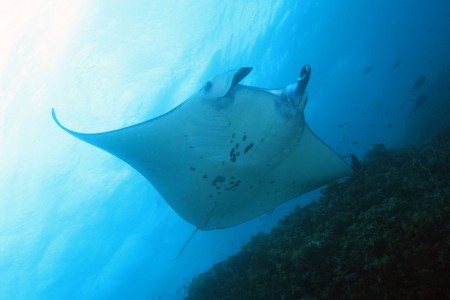
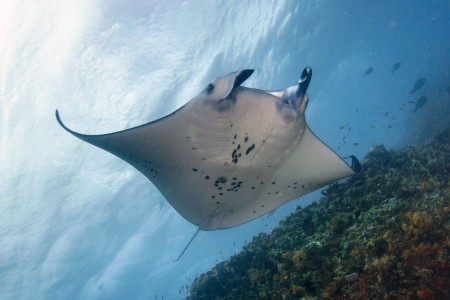
Here’s one example of how you can get details back from a raw file, which are lost in the JPEG file:

When I was shooting this manta ray in Komodo, the ray was too far away and my strobes didn’t really do anything (other than creating some backscatter). When I tried to process the image in Lightroom, all I could do with the JPEG file was this – the image is very blue, the water on the left is totally burned out and there is absolutely no color or light in the reef.

Because I recorded RAW & JPEG at the same time, I was able to get some of the details back when processing the raw file. With a simple white balance and a little processing in Lightroom I managed to get an acceptable image. Of course it would have been better to get it right in the first place, but sometimes it is impossible. The Mantas on that day in Komodo were just very skittish and didn’t want to come close. This image was shot in 2011. This was the last time I ever recorded JPEG & RAW images. After that trip I set my camera to record only RAW. When will you make the change?
I recommend using Lightroom not only for processing your raw files, but as well for organizing your images.
There is the option of getting Lightroom and Photoshop as a bundle with the Adobe Creative Cloud Photography plan (Photoshop CC + Lightroom) for $9.99/month, a very good deal for having the newest versions at all times.
Stay tuned for more Tuesday Tips & Techniques


